AlmaLinux9の標準リポジトリでインストールされるMariaDBのバージョンは10.5になります。
MariaDBのリポジトリを使用して、これよりも新しいバージョンMariaDBをインストールする方法です。
リポジトリの作成
MariaDBのDownloadページアクセスし、設定するリポジトリの内容を作成していきます。
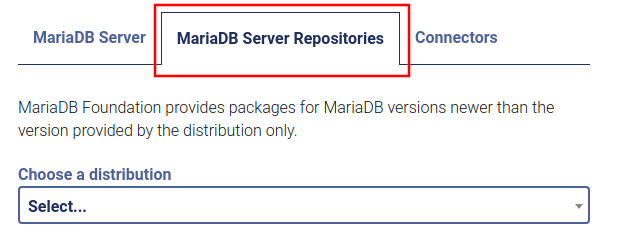
画面に表示されているタブの中から「MariaDB Server Repositories」を選択します。
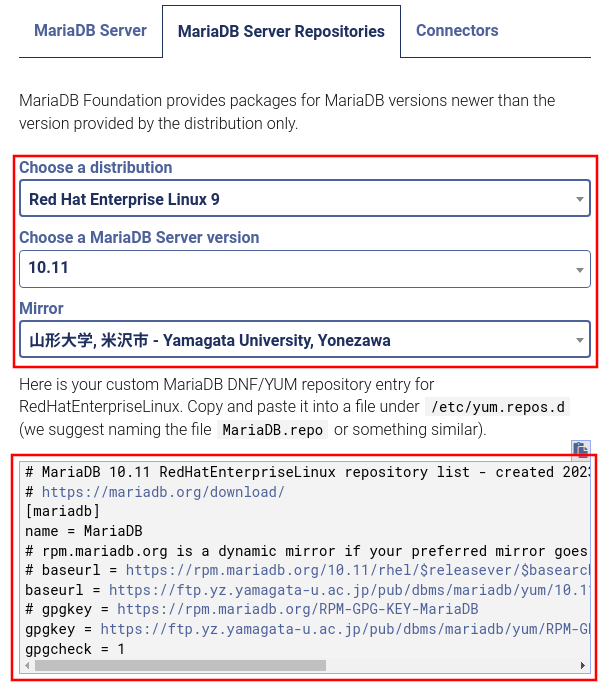
使用するディストリビューションやMariaDBのバージョン、ダウンロードを行うミラーサイトを選びます。
- Choose a distributionでRed Hat Enterprise Linux9を選択
- Choose a MariaDB Server versionが表示されるのでインストールしたバージョンを選択
- Mirrorで日本にあるミラーサーバを選択
すべて選択をすると、作成するリポジトリの内容が表示されます。
表示されたリポジトリの内容をコピペしてMariaDBのリポジトリファイルを作成します。
# vi /etc/yum.repos.d/mariadb.repo
設定例
MariaDBのサイトからコピーした内容の最終行にenabled=1を追加します。
下の設定例ではMariaDBのバージョンは10.11で、ミラーサーバを山形大学に設定した際に出力され内容の最終行にenabled=1を追加しています。
# MariaDB 10.11 RedHatEnterpriseLinux repository list - created 2023-06-02 08:23 UTC
# https://mariadb.org/download/
[mariadb]
name = MariaDB
# rpm.mariadb.org is a dynamic mirror if your preferred mirror goes offline. See https://mariadb.org/mirrorbits/ for details.
# baseurl = https://rpm.mariadb.org/10.11/rhel/$releasever/$basearch
baseurl = https://ftp.yz.yamagata-u.ac.jp/pub/dbms/mariadb/yum/10.11/rhel/$releasever/$basearch
# gpgkey = https://rpm.mariadb.org/RPM-GPG-KEY-MariaDB
gpgkey = https://ftp.yz.yamagata-u.ac.jp/pub/dbms/mariadb/yum/RPM-GPG-KEY-MariaDB
gpgcheck = 1
enabled=1
MariaDBインストール
MariaDBリポジトリの作成が完了しましたら、インストールを行っていきます。
EPELリポジトリ追加
MariaDBをインストールするためにはEPELリポジトリが必要です。
EPELリポジトリを追懐していない場合は、下記の手順でEPELリポジトリを追加してください。
すでに追加済みの場合は、次の工程に進んでください。
# dnf upgrade -y --refresh
# dnf install yum-utils
# dnf config-manager --set-enabled crb
# dnf install -y epel-release
# dnf install -y epel-next-release
インストール
dnfを使ってMariaDB-serverとclientのインストールを行います。
# dnf install -y MariaDB-server MariaDB-client
起動・自動起動設定
MariaDBの起動と自動起動の設定を行います。
# systemctl start mariadb
# systemctl enable mariadb
セキュリティ設定
mariadb-secure-installationコマンドを実行してセキュリティに関する初期設定を行います。
ちなみに、以前はmysql_secure_installationというコマンド名でしたが、MariaDB 10.06からはmariadb-secure-installationに変更されています。
コマンドを実行すると下記の質問があるので、回答を行っていきます。
- Enter current password for root (enter for none):
- 現在設定されているパスワードの入力を求められていますが、最初は設定されていなのでそのまま「Enter」キーを押下します。
- Switch to unix_socket authentication [Y/n]
-
認証をUNIXソケット認証に切り替えるかの確認。
今回は従来のパスワード認証にする場合は「n」を入力しています。 - Change the root password? [Y/n]
-
MariaDBのrootユーザのパスワードを変更するかの確認。
パスワード設定するので「y」または「Enter」キーを入力します。
パスワードの入力を求められるので、設定したいパスワードを入力します。 - Remove anonymous users? [Y/n]
-
初期状態で作成されているanonymousユーザを削除するかの確認。
削除するので「y」または「Enter」キーを入力します。 - Disallow root login remotely? [Y/n]
-
リモートからのrootユーザログインを禁止するかの確認。
禁止するので「y」または「Enter」キーを入力します。 - Remove test database and access to it? [Y/n]
-
初期状態で作成されているtestデータベースを削除するかの確認。
削除するので「y」または「Enter」キーを入力します。 - Reload privilege tables now? [Y/n]
-
privilege(権限)テーブルを再読み込みさせるかの確認。
再読込させるので「y」または「Enter」キーを入力します。
実際にコマンドを実行した際のログになります。
# mariadb-secure-installation

NOTE: RUNNING ALL PARTS OF THIS SCRIPT IS RECOMMENDED FOR ALL MariaDB
      SERVERS IN PRODUCTION USE!  PLEASE READ EACH STEP CAREFULLY!

In order to log into MariaDB to secure it, we'll need the current
password for the root user. If you've just installed MariaDB, and
haven't set the root password yet, you should just press enter here.

Enter current password for root (enter for none):  # Enterキーを押下
OK, successfully used password, moving on...

Setting the root password or using the unix_socket ensures that nobody
can log into the MariaDB root user without the proper authorisation.

You already have your root account protected, so you can safely answer 'n'.

Switch to unix_socket authentication [Y/n] n  # nを入力
 ... skipping.

You already have your root account protected, so you can safely answer 'n'.

Change the root password? [Y/n]  # Enterキーを押下
New password:                    # パスワードを設定
Re-enter new password:           # パスワードを再入力して間違いがないか確認
Password updated successfully!
Reloading privilege tables..
 ... Success!


By default, a MariaDB installation has an anonymous user, allowing anyone
to log into MariaDB without having to have a user account created for
them.  This is intended only for testing, and to make the installation
go a bit smoother.  You should remove them before moving into a
production environment.

Remove anonymous users? [Y/n]    # Enterキーを押下
 ... Success!

Normally, root should only be allowed to connect from 'localhost'.  This
ensures that someone cannot guess at the root password from the network.

Disallow root login remotely? [Y/n]     # Enterキーを押下
 ... Success!

By default, MariaDB comes with a database named 'test' that anyone can
access.  This is also intended only for testing, and should be removed
before moving into a production environment.

Remove test database and access to it? [Y/n]    # Enterキーを押下
 - Dropping test database...
 ... Success!
 - Removing privileges on test database...
 ... Success!

Reloading the privilege tables will ensure that all changes made so far
will take effect immediately.

Reload privilege tables now? [Y/n]     # Enterキーを押下
 ... Success!

Cleaning up...

All done!  If you've completed all of the above steps, your MariaDB
installation should now be secure.

Thanks for using MariaDB!
文字コード設定
日本語の取り扱いをするために文字コードを設定していきます。
サーバ設定
/etc/my.cnf.d/server.cnfでMariaDBサーバの設定を行っていきます。
# cd /etc/my.cnf.d/
# cp -p server.cnf server.cnf_$(date +%Y%m%d-%H%M%S)
# vi server.cnf
[mysqld]部分にcharacter-set-serverとcollation-serverの設定を追加します。
[mysqld]
character-set-server = utf8mb4    #追加
collation-server = utf8mb4_general_ci #追加
クライアント設定
/etc/my.cnf.d/client.cnfでMariaDBクライアントの設定を行っていきます。
# cp -p client.cnf client.cnf_$(date +%Y%m%d-%H%M%S)
# vi client.cnf
[client-mariadb]部分にdefault-character-setの設定を追加します。
[client-mariadb]
default-character-set = utf8mb4  #追加
設定反映
MariaDBを再起動して設定を反映させます。
# systemctl restart mariadb
設定確認
文字コードが正しく設定されているかは、下記の方法で確認することが出来ます。
# mysql -u root -p

MariaDB [(none)]> SHOW VARIABLES LIKE 'character_set%';
+--------------------------+----------------------------+
| Variable_name            | Value                      |
+--------------------------+----------------------------+
| character_set_client     | utf8mb4                    |
| character_set_connection | utf8mb4                    |
| character_set_database   | utf8mb4                    |
| character_set_filesystem | binary                     |
| character_set_results    | utf8mb4                    |
| character_set_server     | utf8mb4                    |
| character_set_system     | utf8mb3                    |
| character_sets_dir       | /usr/share/mysql/charsets/ |
+--------------------------+----------------------------+
8 rows in set (0.001 sec)

MariaDB [(none)]> exit
Bye


コメント