
「CentOS8」でMariaDB公式サイトで公開されているリポジトリを使用して、「MariaDB 10.5」をインストールする方法です。
MariaDBリポジトリの作成
下記URLにアクセスするとリポジトリを作成する画面が表示されますので、それを使用してMariaDBをインストールするためのリポジトリを作成します。
http://downloads.mariadb.org/mariadb/repositories/
使用するリポジトリは下記の方法で表示させることが出来ます。
- 「1. Choose a Distro」で「CentOS」を選択
- 「2. Choose a Release」で「CentOS 8(x86_64)」を選択
- 「3. Choose a Version」で「10.5 [Stable]」を選択
CentOS8がインストールされているサーバのCPUがPowerPCであれば、「CentOS 8(ppc64le)」を選択します。
インストールするMariaDBのバージョンを変更したい場合も適宜使用したバージョンを選択してください。
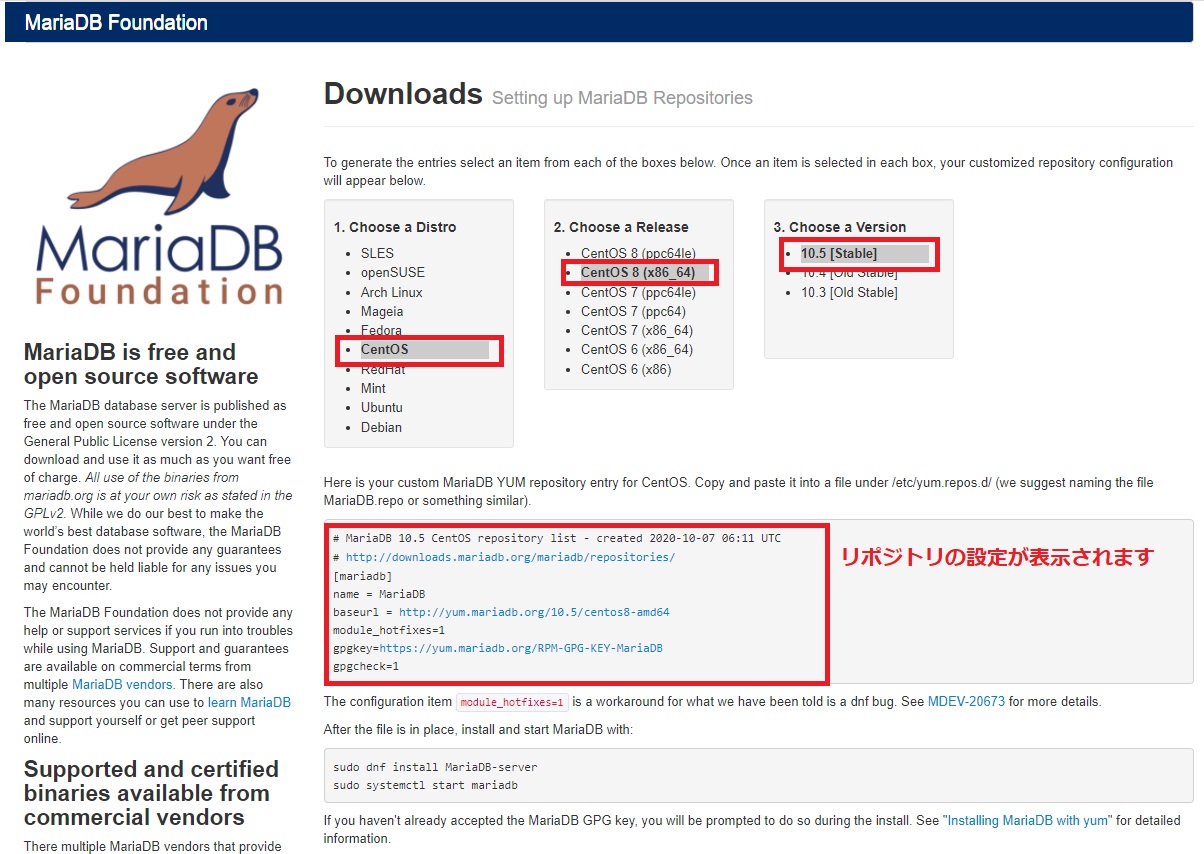
作成するリポジトリの設定が表示されるのでコピーし、「/etc/yum.repos.d/」ディレクトリに「MariaDB.repo」といったような名前でファイルを作成し、そこにコピーしてあった設定を貼り付けてリポジトリを作成してください。
# vi /etc/yum.repos.d/MariaDB.repo
ちなにみ「CentOS8」で「MariaDB 10.5」用のリポジトリの場合、設定内容はこんな感じになります。
[mariadb]
name = MariaDB
baseurl = http://yum.mariadb.org/10.5/centos8-amd64
module_hotfixes=1
gpgkey=https://yum.mariadb.org/RPM-GPG-KEY-MariaDB
gpgcheck=1
インストール
作成したリポジトリを使用して「MariaDB」をインストールします。
「CentOS8」からは「yum」の代わりに「dnf」が採用されているので、そちらを使用してインストールを行っていきます。
# dnf --enablerepo=mariadb install MariaDB-server
インストールが完了しましたら、「MariaDB」の起動と自動起動設定も行っておきます。
# systemctl start mariadb
# systemctl enable mariadb
初期セキュリティセットアップ
インストールが完了しましたら、次にセキュリティを高めるための設定を行っていきます。
「MariaDB」は初期インストールの状態では、セキュリティ的に脆弱な部分がありますので、「mysql_secure_installation」を実行して最低限必要なセキュリティ設定を行っていきます。
# mysql_secure_installation
mysql_secure_installation
「mysql_secure_installation」では下記の設定を行っていきます。
- Enter current password for root (enter for none)
- MariaDBのrootユーザのパスワードを入力
- インストール直後は何も設定されていないので「Enter」キーを押下する
- Switch to unix_socket authentication [Y/n]
- MariaDBのrootユーザの認証を「unix_socket」プラグインを使用した認証に切り替えるかどうかの設定
- MariaDB 10.4からはデフォルトで「unix_socket」は有効になっているので「n」で切り替え処理をskipする
- Change the root password? [Y/n]
- MariaDBのrootユーザを変更するかの設定
- 従来通りのパスワードでの認証を行いたいので「y」を入力してパスワードを設定
- パスワードを設定しない場合はOSの「root」ユーザのみがMariaDBの「root」ユーザとして接続可能という設定となる
- New password:
- MariaDBのrootユーザに設定するパスワードを入力
- Re-enter new password:
- 設定したパスワードを再入力
- Remove anonymous users? [Y/n]
- anonymousユーザを削除するかどうかの設定
- 削除するので「y」を入力
- Disallow root login remotely? [Y/n]
- MariaDBの「root」ユーザのリモートログインを禁止するかの設定
- 禁止するので「y」を入力
- Remove test database and access to it? [Y/n]
- 初期設定で作成されている「test」データベースを削除するかの設定
- 削除するので「y」を入力
- Reload privilege tables now? [Y/n]
- これまので設定をすぐに反映させるかどうかの設定
- 反映させるので「y」を入力
「mysql_secure_installation」実行例
下記は実際に「mysql_secure_installation」を実行した際の作業ログとなります。
# mysql_secure_installation

NOTE: RUNNING ALL PARTS OF THIS SCRIPT IS RECOMMENDED FOR ALL MariaDB
      SERVERS IN PRODUCTION USE!  PLEASE READ EACH STEP CAREFULLY!

In order to log into MariaDB to secure it, we'll need the current
password for the root user. If you've just installed MariaDB, and
haven't set the root password yet, you should just press enter here.

Enter current password for root (enter for none):  <-- 「Enter」キーを押下
OK, successfully used password, moving on...

Setting the root password or using the unix_socket ensures that nobody
can log into the MariaDB root user without the proper authorisation.

You already have your root account protected, so you can safely answer 'n'.

Switch to unix_socket authentication [Y/n] n   <-- 「n」を入力
 ... skipping.

You already have your root account protected, so you can safely answer 'n'.

Change the root password? [Y/n] y <-- 「y」を入力
New password:   <-- 設定したいパスワードを入力
Re-enter new password:  <-- 設定したパスワードを再入力
Password updated successfully!
Reloading privilege tables..
 ... Success!


By default, a MariaDB installation has an anonymous user, allowing anyone
to log into MariaDB without having to have a user account created for
them.  This is intended only for testing, and to make the installation
go a bit smoother.  You should remove them before moving into a
production environment.

Remove anonymous users? [Y/n] y <-- 「y」を入力
 ... Success!

Normally, root should only be allowed to connect from 'localhost'.  This
ensures that someone cannot guess at the root password from the network.

Disallow root login remotely? [Y/n] y <-- 「y」を入力
 ... Success!

By default, MariaDB comes with a database named 'test' that anyone can
access.  This is also intended only for testing, and should be removed
before moving into a production environment.

Remove test database and access to it? [Y/n] y <-- 「y」を入力
 - Dropping test database...
 ... Success!
 - Removing privileges on test database...
 ... Success!

Reloading the privilege tables will ensure that all changes made so far
will take effect immediately.

Reload privilege tables now? [Y/n] y <-- 「y」を入力
 ... Success!

Cleaning up...

All done!  If you've completed all of the above steps, your MariaDB
installation should now be secure.

Thanks for using MariaDB!
文字コード設定
必要であれば、サーバ側で文字コードの設定もあわせて行っていきます。
設定するファイルは「/etc/my.cnf.d/server.cnf」になります。
# cd /etc/my.cnf.d
# cp -p server.cnf server.cnf_`date +%Y%m%d_%H%M%S`
# vi server.cnf
設定内容
今回は日本語と絵文字に対応させるために、文字コードの設定を「utf8mb4」としますので、「[mysqld]」の部分に下記の設定を追加します。
[mysqld]
character-set-server = utf8mb4  <--追加

[client-mariadb] <--追加
default-character-set = utf8mb4 <--追加
※「[client-mariadb] 」の項目がすでにある場合は、そこに「default-character-set = utf8mb4 」の設定を追加してください。
設定がおわりましたら「MariaDB」を再起動させて設定を反映させます。
# systemctl restart mariadb
文字コード確認
設定した文字コードの確認は「MariaDB」に接続後下記コマンドで確認することが出来ます。
show variables like "chara%";
実際にコマンドを実行して確認すると下記のように表示されて、「database」や「server」に文字コード「utf8mb4」が設定されていることが確認できます。
# mysql -u root -p
MariaDB [(none)]> show variables like "chara%";
+--------------------------+----------------------------+
| Variable_name            | Value                      |
+--------------------------+----------------------------+
| character_set_client     | utf8mb4                    |
| character_set_connection | utf8mb4                    |
| character_set_database   | utf8mb4                    |
| character_set_filesystem | binary                     |
| character_set_results    | utf8mb4                    |
| character_set_server     | utf8mb4                    |
| character_set_system     | utf8                       |
| character_sets_dir       | /usr/share/mysql/charsets/ |
+--------------------------+----------------------------+
コメント